
This article covers:
- How to create e-mail accounts
- How to set a catch-all address
- vacation messages
- altering MX records
How to create E-Mail Accounts
To create an e-mail account, sign into the control panel and then click on the "E-Mail Accounts" link, which you can find in the center of your screen, in the E-Mail management section.
You will notice one e-mail account already exists: username@yourdomain.com (where "username" is the control panel sign in name). This account is permanent and cannot be deleted.
On the top of this page you will see a link "Create Mail Account". Click this to create a new e-mail account.
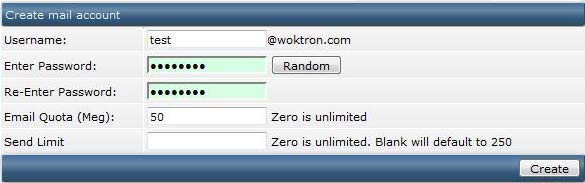
Enter a username and password. Then click "Create". The control panel will then return a page that looks like:

Note: You cannot create a POP3 account if the username is taken by an autoresponder, forwarder, or mailing list.
Changing E-Mail Account Passwords
To change the password of an e-mail account first access the "POP3 E-Mail Accounts" menu. Next, click the change link next to e-mail address).
Once the "Modify POP3 Mail Account" box appears, enter the new password and click Update.
Deleting E-Mail Accounts
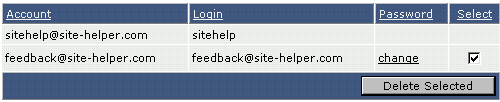
To delete an e-mail account first access the "POP3 E-Mail Accounts" menu. Next, check the box beside the account(s) you wish to delete and press "Delete Selected.
SMTP Authentication
When setting up POP3 account(s) in your e-mail software, you will need to enable SMTP authentication if you choose to use your hosting account for sending mail (instead of using your ISP's mail server).
The SMTP authorization login name / password is the same as your POP3 account login name / password.
Setting a Catch-All Address
When The server receives e-mail to addresses that don't exist, it has to do something with those messages. The control panel gives you three options:
- Server deletes message and notifies sender that the address doesn't exist.
- Server deletes message without notifying sender.
- Server forwards the message to a valid e-mail address.
To choose between these options, first access the "E-Mail Menu" from the control panel. Then, click the "Catch-All E-Mail" icon. You will see a box that looks like this:
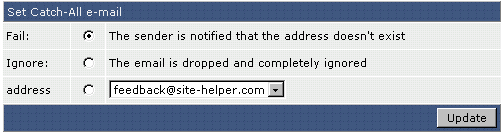
Choose the desired option and click "Update."
Vacation Messages
Vacation messages tell others that you are away.? A common vacation message may sound like: "I have received your e-mail message but I am away on vacation until June 21.? I will respond to it then." Vacation messages are used in conjunction with already existing POP3 accounts.
To create a vacation message, first access the "E-Mail Menu" from the control panel. Then, click the "Vacation Messages icon," followed by the "Set New Vacation Message" link.
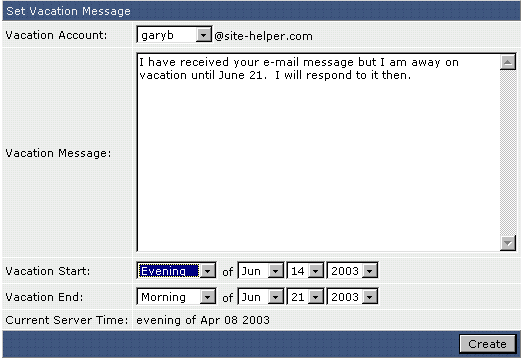
First, select the POP3 account you want to add a vacation message to. Second, enter the vacation message. Third, select when the vacation message will take effect and when it will stop taking effect.? Fourth, click the "Create" button.
Modifying / Deleting Vacation Messages
All vacation messages are listed in the vacation messages menu. To completely delete a vacation message, click on the checkbox next to the vacation account and click "Delete Selected."

A vacation message may be modified by clicking on the "modify" link next to the vacation account. The modify feature allows you to change the message text, vacation start time, and vacation end time.
In this example we no longer want to block all e-mail coming from badsite.com. Check the box next to the filter(s) you want to remove and then click the "Delete Selected" button.
MX Records
Free e-mail services such as everyone.net require that MX changes be made in order for their software to work. This change allows mail destined for your domain to be directed to their server. Please note that changing MX records will prevent your current POP3 accounts, forwarders, autoresponders, and mailing lists from functioning.
To change the MX record, first access the "E-Mail Menu" from the control panel. Then, click the "MX Records" icon.
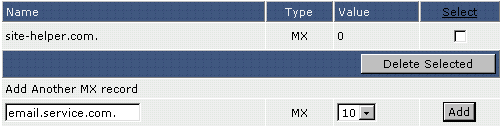
First, delete the old MX record by clicking the checkbox to next to the record name and click "Delete Selected." There should now be no MX records listed.
Next, type in the hostname, followed by a period, given to you by the e-mail provider. Then select the priority level (usually 10) from the dropdown box on the right. The priority level will also be given to you by the e-mail provider. Click "Add."
Note: Be sure to put a period at the end of the hostname.
To restore the original MX settings, enter yourdomain.com. and priority 0 after deleting the other MX record.
Need more help?
Please contact us for more assistance, or visit the DirectAdmin support forum at http://www.directadmin.com/forum.
