
The popular CMS Joomla can be updated in a number of ways. The recommended way to update installations of Joomla! is to use the Joomla Updater component found in the Components menu of your site.
Method 1 Update using the Joomla Updater Component
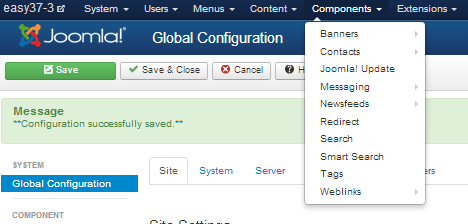
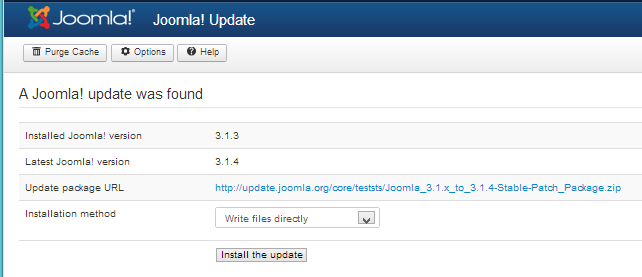
1. Browse to Components, Joomla Update:
If an update is available there will be a message indicating this and a button to press. Otherwise for J2.5 go to Extension manager => Update and press Purge cache.
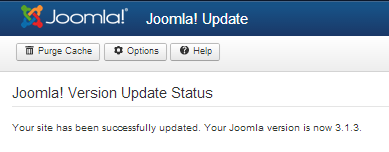
2. Click on the "Install the Update" button and allow the update to run
Method 2 Install Method
In some cases it may not be possible to use the Extension Manager: Update method to update your site. One reason for this might be that you are using a non-standard distribution (for example, a distribution with a different default language installed). Another reason might be that your don't have a reliable enough internet connection to support automatic installation.
In this case, you can still do an easy installation using the Extension Manager: Install screen. Like the Update screen, this method will do the database updates automatically and will completely update your system without any further steps.
Step 1: Make sure you have a current backup of your site
Step 2: Locate the update file
Locate the required archive file (for example, .zip, .tag.gz, or tar.bz2 archive) for your version. If you are updating to an x.x.0 release (for example, from 1.7.3 to 2.5.0), this will normally be a file like Joomla_2.5.0-Stable-Update_Package.zip. If you are updating within the same release series (for example, 2.5.0 to 2.5.1), then the file will be named something like Joomla_2.5.0_to_2.5.1-Stable-Patch_Package.zip.
At this point, you have three options:
- Install from URL
- Install from Directory
- Upload Package File
The screen below shows the Extension Manager: Install screen with the three options labeled.

Install from URL
This option is the easiest, if the archive file is available on a website. With this option, the upgrade archive is loaded directly by the server, so it works well even if your local computer has a slow or unreliable internet connection.
- In the Extension Manager: Install screen, enter the URL for the archive file in the Install URL field.
- Press the Install button.
The system will work for a period of time, up to two minutes or more for a full version update. Then a message indicating a successful installation will display.
Install from Directory
This is the safest method if the server itself has a slow internet connection. With this method, you use FTP to load the unpacked update files into a temporary folder on the server. Then you point to that directory on the server for the installation.
- Unpack the archive file in a temporary directory on your local machine.
- Upload all the files in this directory (for example, using FTP) to a temporary directory that is visible to the web server. For example, you can create a sub-directory under the tmp directory in your Joomla root. For this example, let's say the directory on the server is /home/myuser/myjoomla/tmp/upgrade250).
- In the Extension Manager: Install screen, enter the full path of the temporary directory (on the server) from step 2 (for example, /home/myuser/myjoomla/tmp/upgrade250).
- Press the Install button.
The system will work for a short time (perhaps a minute or less, depending on your server). Then a message indicating a successful installation will display.
Upload Package File
This option requires that you first download the archive file to your local machine. It requires that you have a good connection between your local computer and the server.
- Download the file to your local computer.
- In the Extension Manager: Install screen, click the Browse button next to the Package File field and browse to the archive file.
- Press the Install button.
The system will work for a period of time, up to two minutes or more for a full version update. Then a message indicating a successful installation will display.
Congratulations! At this point, your site is updated.
Important: Clear your browser cache and check that your site is working correctly. See below Checking Your Site
Method 3 - Manual Upgrade
This method is similar to the old method for updating Joomla versions. Here we want to replace the existing program files with the files from the update archive. The advantage of this method is that it will work on slower shared hosts. The disadvantage is that it requires more work by the system administrator.
This method can also be used to repair a site where the automatic update failed due to a server timeout.
Copy the New Program Files to Your Site
There are two ways you can do this.
- Copy the archive file to the root directory of your site and unpack the archive. The update archive will be named something like Joomla_2.5.0-Stable-Update_Package.zip. Note that you need to tell the system to replace any existing files. For example use the FTP File Manager to upload the update file and then use "Unarchive" to unpack it. Check the box "Overwrite existing files".
- If you don't have the ability to unpack the archive on the server, create a temporary directory on your local machine and unpack the archive file there. Then FTP these files to the root directory of your site, overwriting the existing files.
Update the Database
At this point, you should be able to log into the back end of your site with the new version installed. However, you are not done. Navigate to Extension Manager: Database. You will initially have Database problems when you check the Database, similar to the screen below.
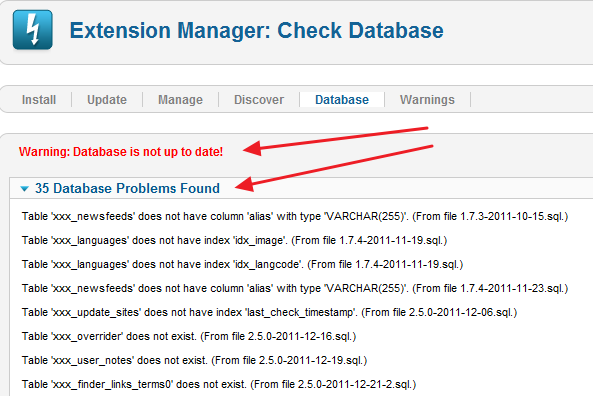
This is expected. Click on the Fix icon to correct the problems. Now the screen should show that the database is up to date.
Install New Extensions
Navigate to Extension Manager: Discover and click on the Discover icon in the toolbar. If the updated version has new core extensions, new extensions will be listed, as shown below.
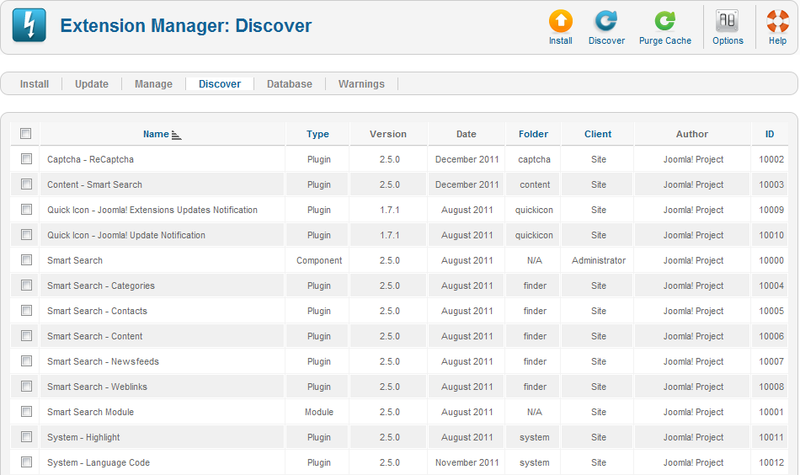
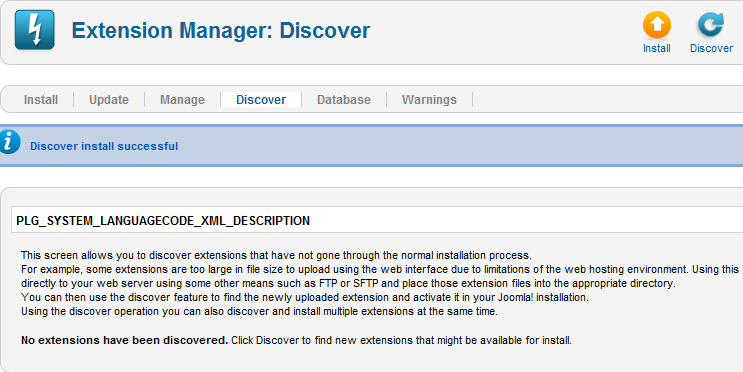
Select all the extensions and click on the Install icon in the toolbar. The system should display a success message similar to the screen below.
Delete removed files
Look at the list of removed files located in administrator/components/com_admin/script.php file. Delete each of the files and folders listed the their applicable array:
public function deleteUnexistingFiles()
        {
                $files = array(
                        '/includes/version.php',
                        '/installation/sql/mysql/joomla_update_170to171.sql',
                        '/installation/sql/mysql/joomla_update_172to173.sql',
                        '/installation/sql/mysql/joomla_update_17ga.sql',
                        '/libraries/cms/cmsloader.php',
....

                $folders = array(
                        '/libraries/joomlacms',
                        '/media/editors/tinymce/jscripts/tiny_mce/plugins/media/img',
                        '/media/plg_highlight',

....
Update the #__extensions Table
At this point, your site is updated. However, there is one more thing to do. The site will think it needs to be updated because a value in the #__extensions table is wrong. To fix this:
- Using phpMyAdmin or a similar tool, edit the row of the #__extensions table where the id column is '700'. (Note that the table prefix will be different in your site. For example, if your table prefix is "jos_", then the table will be called "jos_extensions".
- In the manifest_cache column, you will see the old version in the text (for example, "version":"1.7.3"). Change this to the new version (for example, "version":"2.5.0"). Be careful to not change anything else in this column.
- To check that this was successful, navigate to Extension Manager: Update and click Check for Updates. You should not see the current Joomla version in the list.
At this point, your site should be updated correctly.
