WordPress is one of the most popular blogging platforms for a lot of different reasons. One of them is ease of use. Coupled with Woktron Web Hosting it’s pretty easy to throw up a WordPress blog, slap on a theme and a couple of plugins, and go to town. You can have a fully functional blog up and running in just a few hours
The purpose of this short tutorial is to teach you how to write a new post in WordPress.
Step 1: Login to WordPress
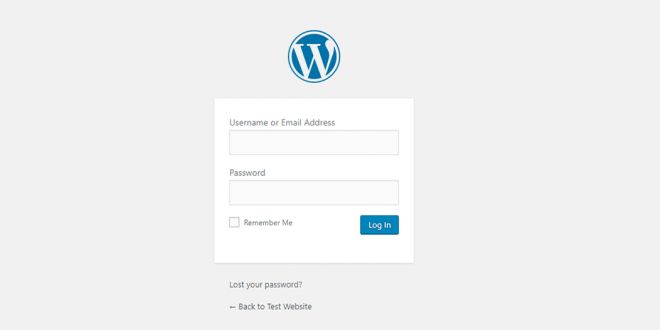
You need to begin by logging in to your new WordPress installation.
Step 2: Open the Add New Post window
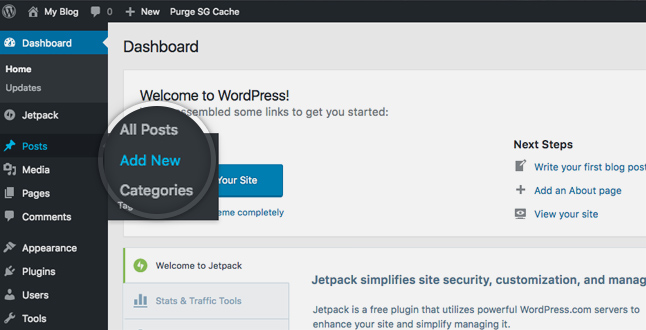
From your WordPress Dashboard, go to Posts > Add New in the left column. The first menu item is Posts. Click on it to expand the menu. You will see Posts, Add New, Categories, and Post Tags. Click on Add New. Alternatively, you can hover over the “+ New” link at the top of your screen and choose “Post” from the dropdown menu that appears.
Step 3: Formatting options
Make sure you are in the Visual tab for the easiest WYSIWYG writing. (If you need to enter HTML, switch to the Text tab.)
In the Visual tab you have formatting options at the top of the post box such as bold, italic, centering, headings, etc. At end of the first row of formatting options at the top of the post box, the last icon is called the Kitchen Sink. Once open, you’ll see more formatting options like underlining, changing font color, adding headings, etc.
Step 4: Write your post
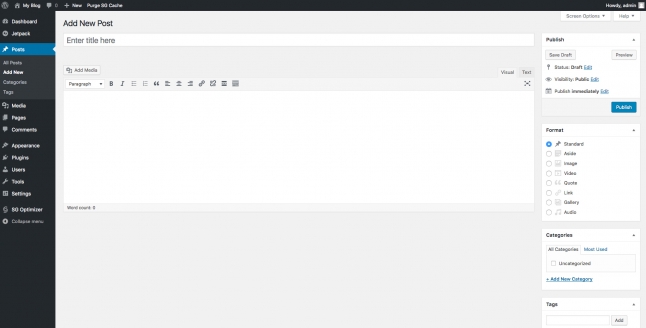
Enter your post title in the top field and your post body in the main window.
You’ll see a word count in the bottom corner keeping you up to speed on how many words you’ve written. If you’re shooting for a specific length, you can take the number of subheadings you want and divide the target word count by it, so you know how many words per section you should aim for. Otherwise, you can just write as much as the topic calls for.
Generally, a good blog post is going to be between 1,500 and 3,000 words. Some blogs get away with much longer posts, and some with shorter, but if you’re under 1,000, you’re probably getting too short for comfort. This is because Google doesn’t like short content, and since you’re asking for a tutorial using WordPress you’re probably a relatively new blogger. This means you don’t have the clout built up yet to be able to get away with the occasional shorter post.
Step 5: Edit your permalink
The permalink is the full URL you see – and use – for any given post, page or other pieces of content on your site. It’s a permanent link, hence the name permalink. A permalink could include your domain name (www.woktron.com) plus what’s called a slug, the piece of the URL that comes after the domain name. This might include a date or a category or anything you please.
Before publishing your post (not after, otherwise you may break your link!), edit the permalink if you’d like. Use keywords and make it as close to the way someone would search for your content on Google.
A simple permalink makes a URL easy to understand and share:https://www.woktron.com/category/post-name
By default, WordPress uses a permalink structure that’s not SEO-friendly. These look something like this:https://www.woktron.com/?p=101
The number you see is the ID WordPress had in mind for this particular article. It’s article number 101 in the database of your site. While Google still understands the content on that page, a URL like this does nothing for your SEO. It does not describe what kind of content the page offers and it’s not something that users are inclined to share.
Step 6: Add media or create links in your post
To add media, such as images or videos – Simply place your cursor in the body of your text where you want the media to appear. Click the Add Media button at the top of the post box.
With WordPress, you have to upload images to the media library. Once in the library, you can use them in as many posts as you want, and they will always come from the same source, so you’re not using up excess web hosting space.
To create a link in your post – Highlight the text you want to make a link and click the link icon (looks like a chain link) on the top row of formatting options. A popup will appear where you can paste the URL you want the link to go to.
Step 7: Select the category (or categories) and tag(s)
In the right side of your screen, you’ll have the option to select categories and tags for your post. (To add a new category, simply click the +Add New Category link at the bottom of the Category box.)
Step 8: Save, schedule or publish your post
Use the Publish box in the New Post window to save your draft or publish your post. Saving your draft is helpful if you’re not quite ready for it to go live. Hitting the Publish button will make it go live immediately.
You have other options in this box as well. You can make this post public, private or password protected. Public is normal and makes it available to all. Private keeps it, well, private. Password protected means anyone who wants to see the post has to have the password you set.
You can also schedule this post to publish at a later time if you’d like. Simply click the Edit link (next to Publish immediately) and you’ll be able to choose a date and time for publication. Click OK to make the Publish button change to Schedule. Setting the date and time is not enough. You must also make sure you click the “Schedule” button so it will publish at the time you specified.
